- Getting Started
- How to Install Church WebApp
- How to login/sign in
- Navigating the Application
- App Workspace Overview
- Searching for data within the system
- Members Management
- How to signup/register
- How to delete/deactivate your account
- Managing user groups
- How to edit a profile
- Managing attendance
- How to delete another account
- How to view a member's details
- Manual activation of account
- Manage Admin Users
- Features and functionalities
- Finance Management
- Others
- Communication
- Permissions
How to Install Church WebApp
Follow these steps to install the application.
1. Download the fresh copy of the Church WebApp zip file, called church_v1.0_lic, where lic in the file name represents your licence number.
2. Login to your cPanel, click on File Manage, click public_html on the left menu for the main domain or locate your subdomain, upload the zip file or copy the unzip files and folders to the main domain or subdomain.
3. If you uploaded the zip file, then extract to the main domain (yourdomain.com) or subdomain (app.yourdomain.com) location, example of the extracted files and folders are shown below:
4. Go back to your cPanel home page, scroll down and select MySQL Databases, under Create New Database, enter the database name and click on Create Database button, then click back when done creating database.
5. While on the same page, scroll down to Add New User, enter username and password, then click Create User. Note the database name, username and password because you will need them later.
6. Link the user you just created to the database you just created by scrolling down to Add User To Database section, select user and database, then click Add button, on the Manage User Privileges page that appears, select ALL PRIVILEGES check box, click Make Changes button
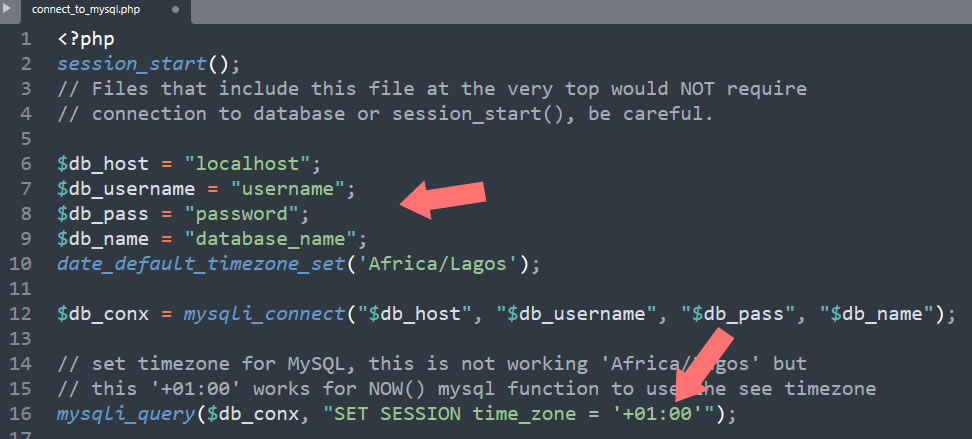
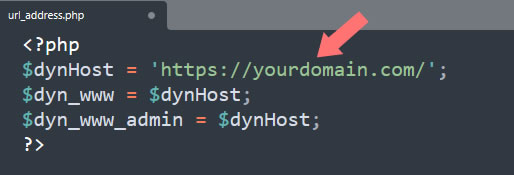
7. Go back to your File Manager section, double-click a folder called scripts, within this folder, you are going to make changes to two files, for config.php file, you enter database name, username and password, you can also change the timezone, in this case plus 01:00 for West Africa and for url_address.php file enter your domain name e.g. https://yourdomain.com/ or http://subdomain.yourdomain.com/ or https://yourdomain.com/folder/ make sure there is a forward slash at the end of it as shown here or on the image below:
8. Import its database by going to your cPanel home page, select phpMyAdmin, select the name of database you created before, at the top of the page, click Import, browse for the file, that is, go to the root folder or directory, you will see a folder called db, double click to open, select the database file called church_v1_db.sql and click Import button.
9. You are done with the installation. Now navigate to the application's login page and click Create an Account to sign up as the supper user; that is, being the first user, you are the system owner. As the superuser, your account will be automatically activated.
10. Note: While you are on the login page, you will have to add the Verification Number or Licence key/number and the domain you wish to run the application. Remember the email that was sent to you when you purchased or downloaded the trial version of the Church WebApp.
11. To allow a newly registered user to be able to activate his/her account, alter login, click Settings, under Basic tab, leave this page open while you follow the next step.
12. Within the help manual, under Others on the left-hand side, click on Manage Settings, in the Settings under the Basic tab section, follow the steps to add your Google Gmail or any other Email address, password and noreply@yourdomain.com email for the application to be able to send activation email to users or members when they sign up or register.
Please don't hesitate to get in touch if you encounter any problems.